- Home
- Beyond Basics
- Underpainting
Exploring Underpainting - A Practical Guide to Richer, Deeper Coloured Pencil Art
Welcome! If you're seeking a way to move your coloured pencil work beyond looking flat and achieve truly remarkable colour depth and vibrancy, then exploring underpainting is an excellent next step.
I know how disheartening it can be when the colours in your drawing look weak or you can see those frustrating little white specks of paper shining through, no matter how hard you press.
For ages, I struggled with this myself. The solution I discovered was underpainting—creating a foundational layer of colour that solves these problems before they even start.
Underpainting not only helps to intensify your colours and make them more luminous, but it also creates a wonderful unified base and adds a real sense of richness to your work. In this guide, we'll explore five distinct methods, which I've grouped into 'dry' and 'wet' techniques to help you choose the best approach for your project and comfort level.
Part 1: Dry Underpainting Techniques
These methods use only dry media and are a perfect place to start as they require no special solvents or water.
Underpainting with Coloured Pencils
This is the most direct method and can be approached in several effective ways. The key to all of them is to begin with light pressure and build your layers patiently.
 8 layers of Caran d'Ache Luminance wax pencil on card
Direct Layering
This involves using tints of a similar colour for your foundation. For a rich red apple, you might start with layers of soft pinks and oranges. This builds a complex and luminous base far richer than a single red pencil could achieve alone.
Grisaille (Monochrome Underpainting)
'Grisaille' is simply a term for creating an underpainting in monochrome, typically grey. By completing a fully-rendered drawing in shades of grey first, you resolve all of your values and forms. You can then glaze your full colour over the top. This is an incredibly powerful technique for ensuring your drawing has realistic depth.
Carol's Tip: You don't have to use just grey! I often use shades of brown or a dull purple for a warmer result, especially in my animal portraits.
Complementary Colour Underpainting
To make a colour appear richer, you can underpaint with its complement (the colour opposite it on the colour wheel). For instance, a light layer of blue beneath an orange, or green beneath a red, will create a subtle vibration and make the final colour feel much richer and more lifelike.
For a deeper understanding of how these colours interact, see my guide to Colour Basics for Coloured Pencils.
 Derwent Artist pencils in the colours shown, on Strathmore Colored Pencil paper. A single layer of each colour was used with firm pressure.
Burnishing as a Finishing Step
While not strictly an underpainting, burnishing is relevant here.
After you've built up several layers, you can use a light-coloured pencil or a colourless blender with firm pressure to smooth the surface. This blends the layers together seamlessly and eliminates any remaining paper grain.
I cover this technique in detail in my Core Techniques: Burnishing Explained page.
Part 2: Wet Underpainting Techniques
These methods involve a liquid to dissolve the pigment and cover the paper quickly. They are excellent for creating vibrant, even foundations.
Underpainting with Solvents
Here, you lay down a solid layer of coloured pencil and then brush over it with a solvent.
The solvent dissolves the wax or oil binder, turning the pigment into a paint-like liquid that you can move around before it soaks into the paper.
This is fantastic for eliminating paper speckle and creating a very smooth base for further detail work.
My Preferred Solvent: I like to use a product like Zest-It, which is widely available in the UK. It's citrus-based, non-toxic, and dries quickly.
Carol's Tip: A little goes a long way. Use a small, firm brush and make sure it’s damp, not soaking wet. Always work in a well-ventilated area.
For a complete overview of products and safety, please see my Guide to Coloured Pencil Solvents.
Underpainting with Watercolour Pencils (Aquarelles)
This is one of my favourite methods for creating a fast, vibrant underpainting. You simply apply the watercolour pencils dry, then activate them with a clean, damp brush.
The feeling of seeing those dry pencil lines dissolve into a beautiful, transparent wash of colour is wonderfully satisfying.
It allows you to establish your base colours and values very quickly. If you apply too much pigment, you can often lift some of it back out with a clean, damp brush and a paper towel while it's still wet.


Underpainting with Liquid Watercolour or Ink
For a uniform base, you can use traditional watercolour paints or diluted ink.
I find a monochrome ink wash particularly effective for establishing strong values from the outset. You use less water for dark areas and more for light areas.
Once this layer is completely dry, you can apply your wax or oil-based coloured pencils on top. The colour of the top layers will shine through beautifully.
A Word of Caution: This method is the least forgiving. It's very difficult to correct misplaced edges once the watercolour or ink is dry, so careful planning of your initial drawing is essential.
For this, using a good, heavy paper is vital. Learn more in my Guide to Choosing Paper and Guide to Stretching Watercolour Paper.
Which Technique is Right for You?
For a Simple, Controlled Start: Begin with Grisaille using only your dry pencils. It's the best way to master value and form.
For Speed and Vibrancy: Try an Aquarelle (Watercolour Pencil) underpainting. It's fast, effective, and very rewarding.
For a Painterly, Blended Effect: An underpainting with Solvents is your best choice.
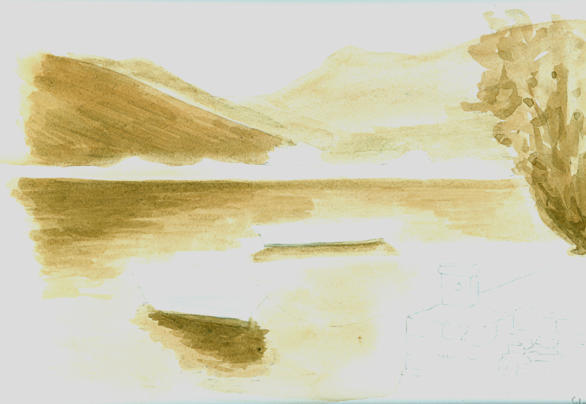 Monchrome underpainting
Experimentation is the best way to discover which underpainting method best suits your style and subject matter.
Don't be afraid to try them on small test pieces first. By creating a solid foundation, you set yourself up for success, allowing you to build those rich, deep, and impressive layers of colour that will make your artwork truly stand out.
 Beginning to add coloured pencil
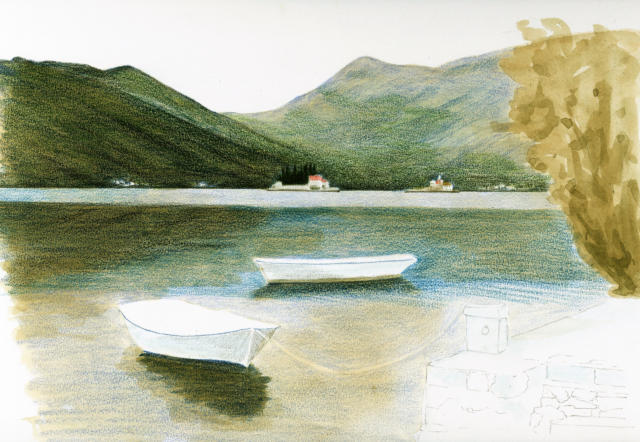
 Completed painting
You might like these
How to Combine Pastel Pencils and Coloured Pencils for Depth
Layer coloured pencils over pastel pencils for atmospheric depth. Learn the underpainting technique, the crucial fixative step, and how to add crisp details
Realistic drawing of a cat: Bring cats to life with coloured pencils
Create a realistic drawing of a cat with our tutorial. Learn to use coloured pencils to capture the textures of a cat's fur, eyes, and features.
Types of Drawing Pencils: A Complete Guide for Artists and Beginners
Discover the different types of drawing pencils and how to use them. Explore graphite, charcoal, mechanical, and carbon pencils to find your perfect match


Copyright © 2009- pencil-topics.co.uk All rights reserved
Home | About Us | Contact Us | Privacy Policy