- Home
- Realistic Portrait of a Cat
- How to Photograph Pets
How to Photograph Pets for Coloured Pencil Success
Snapping the perfect photos of your rambunctious puppy who won't sit still, curious cats who insist on exploring every nook and cranny, or playful kittens always on the move, can be a daunting task.
As any coloured pencil artist knows, a great reference photo is the perfect starting point for a stunning pet portrait. But how do you capture that special moment when your pet's personality shines through?
You might find yourself struggling to freeze the moment when their ears perk up, their tail starts wagging, or they give you that irresistible 'who, me?' look.
Don't worry if you're not a seasoned photographer – with a little practice and patience, you are ideally placed to achieve what a professional will find difficult.
Think about it: you're the one who knows your pet's quirks, habits, and favourite spots in the house.
You know how they tilt their head when they're curious, or how their tail wags when they're excited. This insider knowledge gives you a unique advantage in snapping photos that truly show their character.
For example, try capturing your pet's morning routine – whether it's stretching on the windowsill or pouncing on a favourite toy. These everyday moments can reveal their personality and make for wonderful reference photos.
Plus, the process of photographing your pet can be a fun bonding experience!
Why great pet photos matter for coloured pencil artists
When reviewing potential references, you've likely found yourself squinting at distant, poorly-lit photos, struggling to make out the details of a dog's face, let alone capture the sparkle in its eyes.
Maybe you've tried to draw a cat's fur, only to realise that the photo you're working from doesn't show the texture and detail you need to get it just right.
But what if you could learn how to photograph pets and create reference photos that truly inspire your art? Photos that capture the soft, golden light that brings out the warmth in a dog's coat, or the way a cat's whiskers twitch with every sniff of the air.
With the right photography skills, you can create reference photos that transport you to a world of artistic possibility.
Preparing for your pet photo session
Before you start snapping away, take 10-15 minutes to prepare the perfect setting for your furry friend.
Collect some of your pet's favourite toys or treats to keep them engaged and entertained during the photo shoot. For example, Louis's ball in the photo and subsequent drawing below, show his playful side even when he was relaxing.

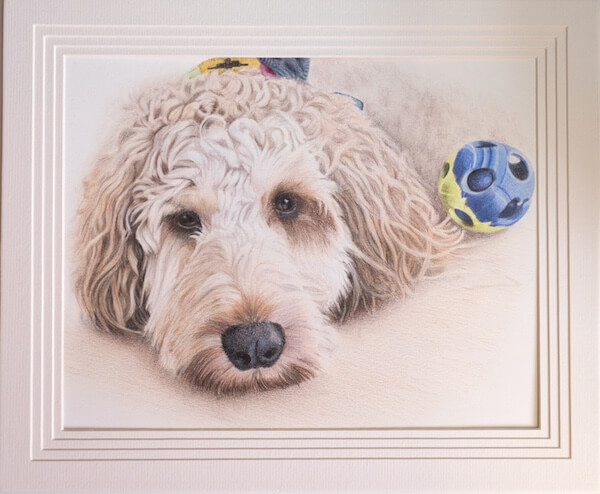
Make sure your camera or smartphone is fully charged and has enough storage space to capture all the adorable moments. You don't want to run out of battery or storage mid-shoot!
Set up a calm and comfortable environment for your pet. The more relaxed your pet is, the better your photos (and ultimately your artwork) will turn out. So take a few deep breaths, get your pet settled in, and let the photo shoot begin!
Get the lighting right
Imagine taking a photo of your pet in a dimly lit room versus outside on a sunny day. The difference is striking, right?
Soft, natural daylight is the most flattering light for pet portraits. It brings out the texture of their fur, making it look soft and luxurious.
To achieve this, if you're shooting indoors, position your pet near a large north-facing window, which receives soft, indirect light. This will help minimise harsh shadows and unflattering highlights.
To avoid these problems, consider going outdoors and shooting on overcast days or in shaded areas, like a covered patio or a tree-lined park. These conditions will provide soft, diffused light that will make your pet's features shine.
By paying attention to lighting, you'll be able to capture stunning reference photos that will help you create beautiful, lifelike pet portraits.
Let me give you an example of what can go wrong.
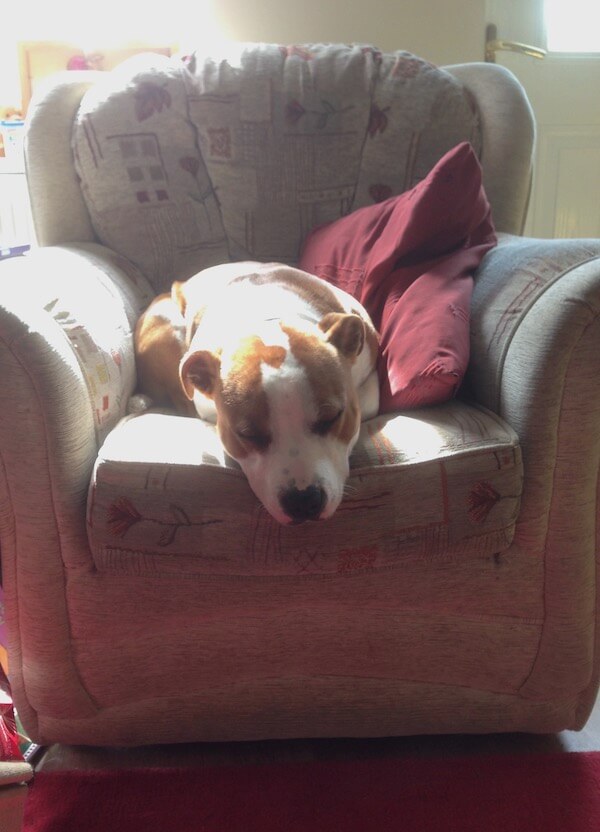
My sister-in-law photographed her sleepy pup Bentley napping in an armchair, bathed in bright light streaming through a window.
Sounds perfect, right? Not quite.
The quantity of light wasn't the issue - it was the quality that caused problems.
Problem 1: Harsh shadows and underexposure

The first photo properly exposed Bentley's back, but completely underexposed the shadowy areas. The strong backlighting created an image with too much contrast, obscuring all detail in his face.
Problem 2: Blown-out highlights
Adjusting the camera settings won't always work either.
The next attempt overexposed the bright window areas, blowing out all the detail in Bentley's white fur.
Problem 3: Unwanted colour cast
To make matters worse, the red rug reflected onto the beige chair, casting a pinkish tint where it shouldn't be. Accurate colours are a must for realism.
Ditch the flash
While it might be tempting to use flash in low-light situations, it can create unnatural reflections in your pet's eyes and wash out their fur colour.
Instead, try adjusting your camera settings to work with the available light or use a reflector to bounce extra light onto your subject.
Focus on the eyes
One of the most important tips I can give is to focus on your pet's eyes.
The eyes are often the focal point of a portrait, and having them crisp and clear can make a difference in your final artwork.
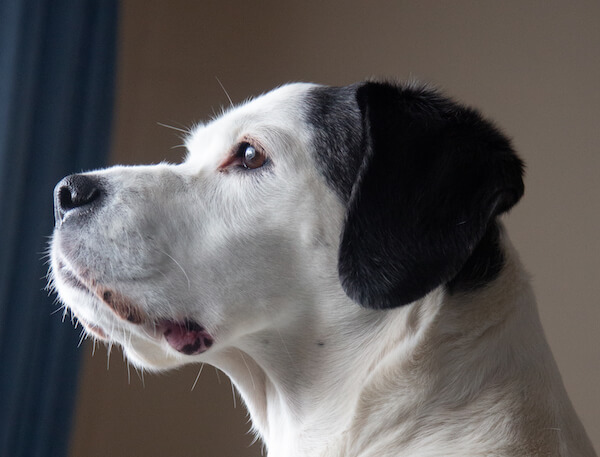
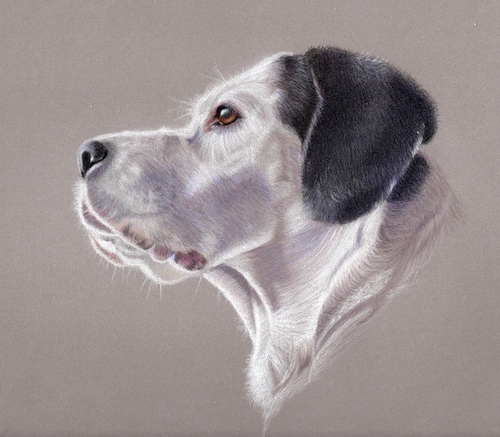
Check out that twinkle in Polly's big brown eyes! I managed to nail the exposure and focus, by standing side on to the window. Below is the portrait I drew from this photo.
Capturing sharp pet portraits: tips for amateur photographers
As an amateur pet photographer, you know how challenging it can be to get your furry friend in focus, especially when it comes to their eyes.
A sharp, well-defined gaze is essential for a drawing reference photo.
However, many cameras tend to focus on the centre of the viewfinder or the closest object to the lens, often resulting in blurry or poorly lit eyes.

The problem with Autofocus
When your pet is positioned off-centre, the camera's autofocus system may prioritize the background or the closest object, such as the dog's nose, leaving the eyes out of focus.
This can be frustrating, especially if you're trying to capture a specific expression or moment.
Solutions for sharp pet photos
Fortunately, there are a few techniques you can use to overcome this challenge:
- Focus and recompose: Focus on your pet's eyes, press the shutter button halfway, and hold it. Then, move the camera to position the eyes off-center, and press the button down fully without jogging the camera. This technique allows you to control the focus point and composition of the shot.
- Single-spot focus: If your camera has this feature, switch to single-spot focus mode and use the camera controls to move the focus point (usually a small box on the screen) over your pet's eye. This will ensure that the camera focuses on the eye rather than the background or other objects.
- Animal eye autofocus: Some high-end cameras come equipped with animal eye autofocus, which can detect and track the eyes of dogs, cats, and birds. This feature is especially useful for capturing sharp portraits of moving subjects.
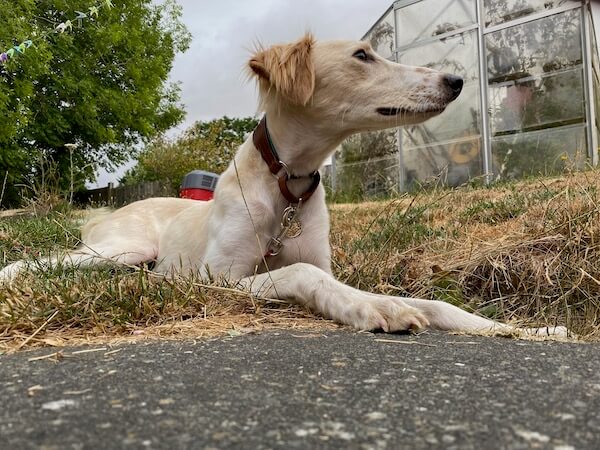
Shoot at eye level for natural results
When photographing pets, it's essential to get down to their level to capture a natural perspective. Shooting from above can distort proportions and create an unflattering look. To illustrate this, let's take a look at two examples.
In the first photo, the labrador's head and shoulders appear disproportionately large compared to her hindquarters, and her eyes are almost invisible. This isn't the most flattering composition for a portrait.

In contrast, the second photo, taken from a lower angle, is an improvement, but the head and feet still appear slightly oversized due to the limitations of the camera phone used.
Notice how the eyes don't quite pop? Bright, engaging eyes are crucial in drawing the viewer in.
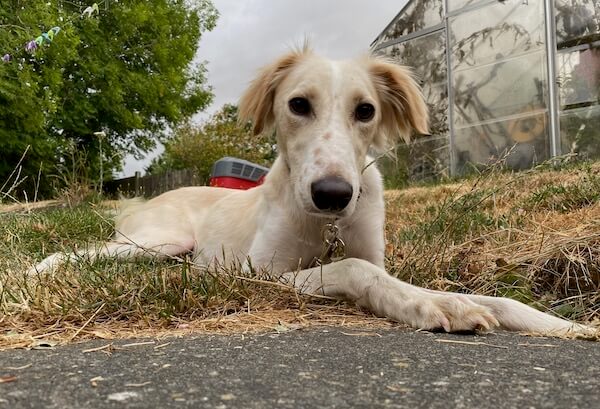
To capture the perfect shot, take multiple photos from various angles to increase your chances of getting that hero shot. This will give you a range of references to work from, making it easier to create a more accurate and engaging drawing.
The limitations of cropping
You might wonder, "Can't I just crop a photo that was taken from too far away to get a better composition?"
While cropping can help, it's not the best solution. When you crop a photo, you're reducing the number of pixels available for drawing the portrait.
Think of pixels like puzzle pieces – the more you have, the more detailed and clear your picture will be. Cropping essentially throws away some of those puzzle pieces, making it harder to achieve a high-quality portrait.
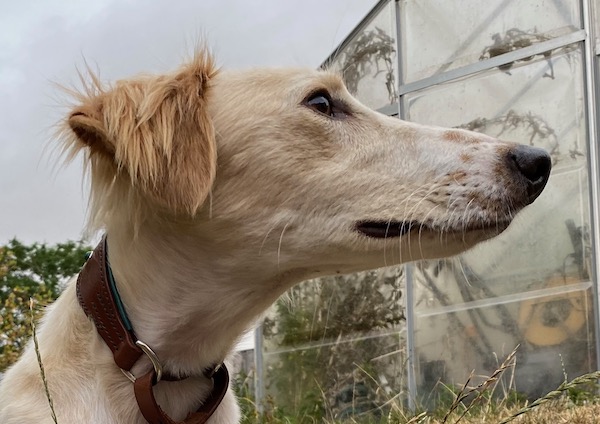
Best practices for capturing pet portraits
To capture stunning pet portraits, remember the following tips:
- Shoot at eye level to capture a natural perspective
- Take multiple photos from various angles to increase your chances of getting the perfect shot
- Avoid relying too heavily on cropping, as it can reduce the quality of your portrait
Get Closer - But Not Too Close!
One crucial aspect to consider is the distance between you and your subject. Let’s explore the importance of finding the perfect balance between getting close and avoiding distortions.
The risks of getting too close
When taking photos of your pet, it's tempting to get as close as possible to capture every detail.
However, getting too close can distort your pet's features, resulting in unflattering and inaccurate representations.
This is especially true when using a smartphone, as the wide angle lens can exaggerate facial features and create unappealing distortions.
Finding the sweet spot
So, how can you find the perfect distance for capturing stunning pet photos? Here are a few tips to get you started:
- Smartphone users: Experiment with different distances to find the sweet spot that allows you to fill the frame without distorting your pet's features.
- Camera users: If you're using a camera with interchangeable lenses, consider using a telephoto lens to keep your distance while still capturing close-up details. This will help you avoid disturbing your pet and ensure a more accurate representation.
Final tips for capturing stunning pet photos
By following these simple tips, you'll be well on your way to capturing stunning pet photos that will serve as excellent references for your coloured pencil artwork:
- Experiment with different distances to find the perfect balance for your pet and camera.
- Pay attention to your pet's body language and adjust your distance accordingly. If they appear uncomfortable or stressed, it's best to give them some space.
- Consider using a tripod or stabilizer to minimize camera shake and ensure sharp, clear photos.
Capturing stunning pet photos requires a combination of technical skills and attention to detail.
By finding the perfect distance and following these simple tips, you'll be able to create beautiful, accurate representations of your furry friends that will inspire your coloured pencil artwork.
Your turn
As we wrap up this page on capturing stunning pet photos, remember that the perfect shot is not just about technical skills, but also about understanding and connecting with your furry subject.
You'll not only create inspiring reference photos for your coloured pencil artwork but also cherish the special moments you share with your pet.
So, the next time you pick up your camera or smartphone, don't just aim for a good photo – strive for a great one.
Experiment with different techniques, pay attention to the lighting, and focus on those captivating eyes. With practice, patience, and a willingness to learn, you'll be well on your way to capturing pet portraits that truly come alive.
As you continue to hone your skills, I encourage you to share your experiences, tips, and favourite pet photos with our community. Let's inspire and motivate each other to create artwork that celebrates the unique spirit of our beloved pets.
Improve Your Pencil Art: Get Free Tips & Techniques
Sign up for our newsletter – just occasional emails packed with practical advice and inspiration for pencil artists like yourself